
In the last post I had the concept of combat implemented, but not entirely wired up. It still didn’t work from “press key and execute attack”. That is what todays post is about. Although I have the animations all up and working I’ll split it into two parts to keep these posts nice and short.
Oh also I updated my project to use Unreal 5.4.4 instead of 5.3 as they added a ton of new features for handling retargeting animations.
Handling Input
My input system is local/network agnostic so I only really need to handle key actions once. My input system was only handling movement, so I had to add the implementations for handling action(s). These actions will be the characters attacks and abilities. I only had a small change to the PMO library’s PMOCharacter component, which is adding the HandleActionInput. This method will grow in complexity as we add in more abilities.
void HandleActionInput(const float DeltaTime, logging::Logger *Log, input::Input &Inputs)
{
	// Base Attack
	if (Inputs.IsPressed(input::MouseLeft))
	{
		if (CharacterEntity.is_valid() && CharacterEntity.is_alive())
		{
			Log->Info("HandleActionInput: Character is alive!");
		}

		//CharacterEntity.get<getweapon component>
		if (CharacterEntity.has<combat::IsAttacking>())
		{
			Log->Info("HandleActionInput: Character is already attacking!");
			return;
		}
		// TODO look up character abilities to determine how to spawn the attack, but for now, default to melee attack
		auto World = CharacterEntity.world();
		Log->Info("HandleActionInput: Got World!");
		World.entity().set<combat::AttackDetails>({CharacterEntity, 2.f, 2.f, .72f, 1.20f, 1, combat::AttackContactShape::Sphere});
		CharacterEntity.add<combat::IsAttacking>();
		Log->Info("HandleActionInput: Created combat attack!");
	}
}
Handling input from Unreal
I’d like to say it’s straight forward, but with the enhanced input system there’s a few things you need to add before you can bind an action to a key, at least for C++ projects.
- Add the Input Action asset(s)
- Map it to IMC_DefaultInput (or whatever input context you created)
- Write the C++ backing code to handle the action, this includes adding the specific InputAction type and binding it to call a function on trigger.
- Actually map it to the Character class/blueprint (THIS PART GOT ME)
Creating Input action assets
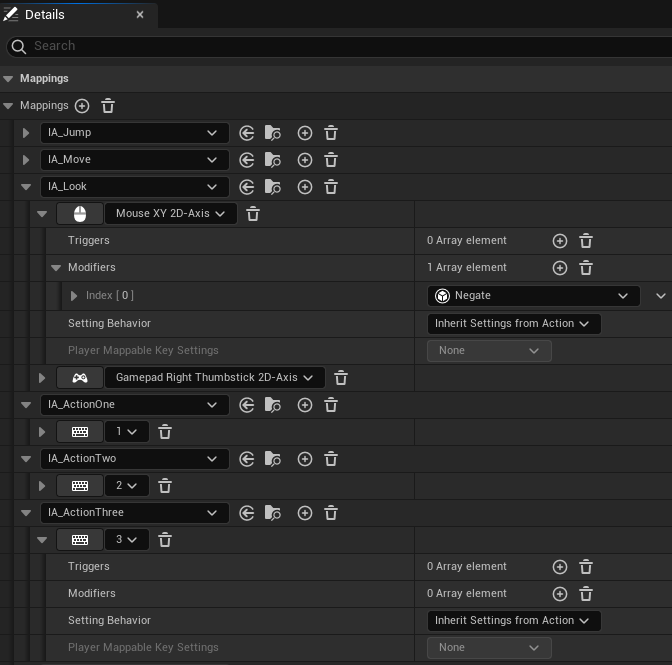
This part is pretty straight forward, create each input action asset type per action, set some values, and save it to a file. Here’s the MouseLeft action (which will probably be renamed to LightAttack or something).

I created each action for my mouse left, middle, right and abilities 1 – 10.
Adding inputs to our Mapping Context
Mapping contexts allow us to switch out the meanings of key bindings dynamically. For now we just have / will use the default context. For this we add in our newly created input action assets, one at a time and set which keyboard key (or mouse button or controller pad button etc) will trigger it:
Mapping inputs:
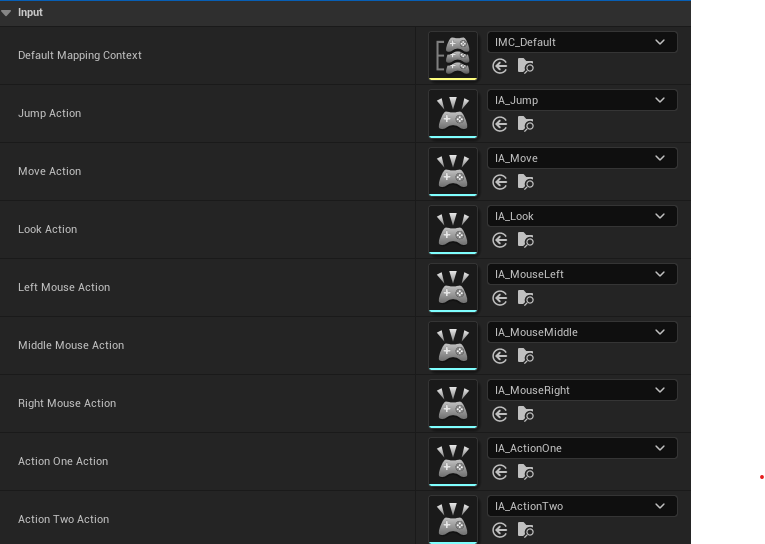
To map inputs to actions in code, first you need to add the the classes/properties to your character class:
/** Mouse Actions */
UPROPERTY(EditAnywhere, BlueprintReadOnly, Category = Input, meta = (AllowPrivateAccess = "true"))
class UInputAction* LeftMouseAction;

UPROPERTY(EditAnywhere, BlueprintReadOnly, Category = Input, meta = (AllowPrivateAccess = "true"))
class UInputAction* MiddleMouseAction;

UPROPERTY(EditAnywhere, BlueprintReadOnly, Category = Input, meta = (AllowPrivateAccess = "true"))
class UInputAction* RightMouseAction;

/** Input Actions (Abilities) */
UPROPERTY(EditAnywhere, BlueprintReadOnly, Category = Input, meta = (AllowPrivateAccess = "true"))
class UInputAction* ActionOneAction;
// ... Two/Three/Four etc
One thing to remember about coding in Unreal Engine is that there is a lot of magic under the hood. With this in mind, we can do neat things like have our actions take variable argument types and bind a custom function to it. Unreal will just generate the necessary function/method definitions for us:
//Looking
EnhancedInputComponent->BindAction(LookAction, ETriggerEvent::Triggered, this, &APMOClientCharacter::Look);

// Mouse Actions
EnhancedInputComponent->BindAction(LeftMouseAction, ETriggerEvent::Triggered, this, &APMOClientCharacter::InputAction, input::MouseLeft);
EnhancedInputComponent->BindAction(MiddleMouseAction, ETriggerEvent::Triggered, this, &APMOClientCharacter::InputAction, input::MouseMiddle);
EnhancedInputComponent->BindAction(RightMouseAction, ETriggerEvent::Triggered, this, &APMOClientCharacter::InputAction, input::MouseRight);

// Ability Actions
EnhancedInputComponent->BindAction(ActionOneAction, ETriggerEvent::Triggered, this, &APMOClientCharacter::InputAction, input::ActionOne);
EnhancedInputComponent->BindAction(ActionTwoAction, ETriggerEvent::Triggered, this, &APMOClientCharacter::InputAction, input::ActionTwo);
You’ll note the “Looking” BindAction and the “Mouse/Action” BindAction take a generic function and variable arguments. This allows us to create a custom function where we can easily handle all of these inputs:
void APMOClientCharacter::InputAction(input::InputType Input)
{
	auto Movement = Cast<UPMOMovementComponent>(GetCharacterMovement());
	if (Movement)
	{
		bool bPressed = true;
		Movement->CollectInput(Input, bPressed);
	}
}
Mapping Context to BP_ThirdPersonCharacter
Here’s the part that got me. even though we added the mapping context, and added our assets to the context, you still need to map / add each individual input action to the character class!
Now when I press mouse left/right, or keys 1 through 10, it goes from Unreal, to the pmo library all the way to my PMO server to spawn additional components or execute flecs systems!
The next post will cover how I got the animations in from Mixamo and wired up the animation blueprint to trigger them when the character is attacking.
