
Now that our input is handled, it’s time to get some animations in to see our character making their attack. This requires quite a few additional steps, along with some changes I wanted to make.
The process was as follows:
- Download animations
- Load them into UE5
- Retarget them to the UE5 skeleton
- Realize I need to add some logic to the character to determine “if attacking”
- Update animation blue print that calls this logic to determine if attacking
- Setup debug renderer to visualize attack
- Adjust the attack to spawn the attack sensor in front of the character instead of enveloping them
And with that, let’s begin!
Getting animations from mixamo
If you aren’t aware, there’s a ton of free animations available on mixamo. In my case I want some slashy slashy animations so I searched for slash and downloaded the Great Sword Pack, the Pro Shield and Sword Pack and the Lite Sword and Shield Pack. My first attempt at loading these into UE5 failed. After consulting with a friend he mentioned you need to download a single animation first to get the skeleton information into UE5.
When downloading the single animation, I chose the following settings:

When downloading the packs I downloaded with the following settings:
- Format: fbx
- Pose: Original Pose
- FPS: 30
- Keyframe Reduction: Uniform
If you just try to import the packs directly and select the UE mannequin skeleton, you’ll probably got the following error:
Mesh contains root bone as root but animation doesn’t contain the root track.
Import failed.
As I mentioned above, the trick is to import the single animation first to get the skeleton, then when you import the pack, you’ll select the skeleton that the first animation used, in my case it just named the skeleton the name of the animation I initially loaded: Standing_Melee_Attack_Horizontal_Skeleton.
Now that we have all the animations loaded we need to retarget them to our UE5 mannequin. This is also easy, right click any of the animations from the pack you downloaded and choose “Retarget Animations”. You’ll see the following window modal show up:
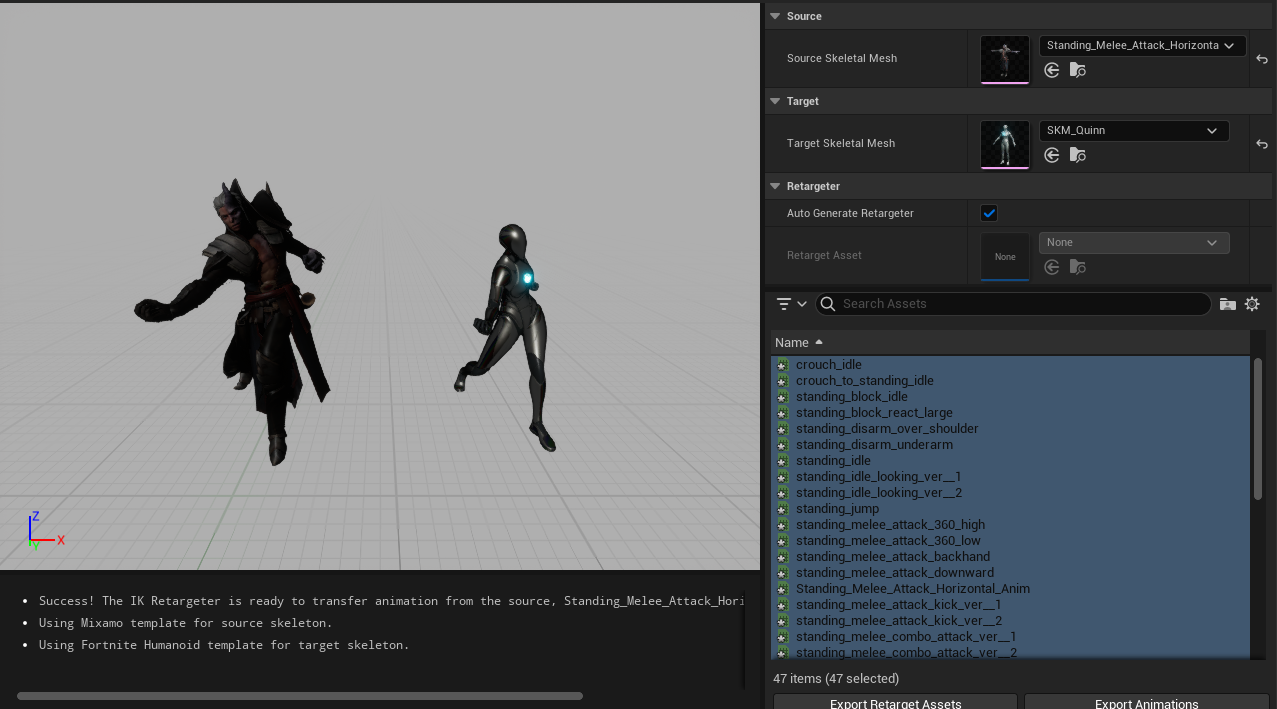 Select the UE5 mannequin for “Target”, highlight all the animations you want to retarget and bada bing you now have animations retargeted!
Animation blueprint fun
UE5’s Animation blueprint system is how you turn your characters current states into determining which animations to run. Like other blueprint systems it uses a node/graph based design to configure it. There’s two parts to it, the event graph and the anim graph.
Configuring the event graph

On initialization, we get the owning actor, cast it to a character then set our movement component. Both our local player and all network players all inherit from the base UE Character class. Both also have (custom) movement components that inherit from the base movement component class. This allows us to reuse our animation behaviors across both local & network characters (and probably NPCs later on).
On update (or tick) this component is used to pull out values and set more values which will be used in our animation graph. You’ll notice it setting some booleans like “IsFalling” or “ShouldMove” these are used for state transitions.

One problem… there’s no “IsInCombat”. We need to build this ourselves!
Creating a combat component
Now we could just add some public blueprint method to our character, but then we’d need to implement the same thing for network players. This is where Unreal engine’s component architecture comes to the rescue. Instead, I’ll create a CombatComponent which will attach to all characters which “can do combat” and then I only have to do this once!
Here’s my combat component class:
class PMOCLIENT_API UPMOCombatComponent : public UActorComponent
{
	GENERATED_BODY()

public:
	// Sets default values for this component's properties
	UPMOCombatComponent();

protected:
	// Called when the game starts
	virtual void BeginPlay() override;

	UFUNCTION(BlueprintCallable, Category = "Actions")
	bool IsInCombat();

	/** return either empty component if not set yet, or the actual properly resolved entity from our ECSWorld */
	flecs::entity GetCombatOwner();

public:
	// Called every frame
	virtual void TickComponent(float DeltaTime, ELevelTick TickType, FActorComponentTickFunction* ThisTickFunction) override;

private:
	TObjectPtr<UPMOSubsystem> PMOSystem;
	flecs::entity CombatOwner;
};
And here’s the implementation for checking if we are in combat:
bool UPMOCombatComponent::IsInCombat()
{
	auto Combat = GetCombatOwner();
	return Combat.is_valid() && Combat.has<combat::IsAttacking>();
}

flecs::entity UPMOCombatComponent::GetCombatOwner()
{
	if (!PMOSystem)
	{
		UE_LOG(LogTemp, Error, TEXT("UPMOCombatComponent::GetCombatOwner Failed to get UPMOSubsystem!"));
		return CombatOwner;
	}

	if (CombatOwner.is_valid() && CombatOwner.is_alive())
	{
		return CombatOwner;
	}

	UE_LOG(LogTemp, Error, TEXT("UPMOCombatComponent::GetCombatOwner Getting combatowner!"));
	auto EntityComponent = GetOwner()->GetComponentByClass<UPMOEntityComponent>();
	if (EntityComponent)
	{
		CombatOwner = PMOSystem->GetEcsWorld().entity(EntityComponent->Entity());
		UE_LOG(LogTemp, Error, TEXT("UPMOCombatComponent::GetCombatOwner Got combatowner!"));
	}
	return CombatOwner;
}
GetCombatOwner does all the heavy lifting of caching our CombatOwner flecs entity (the character entity) and querying if it has the combat::IsAttacking component attached or not. This CombatComponent is then initialized in both our Unreal Character class, and our Unreal NetworkCharacterActor class.
Here’s the init of the Network Character:
ANetworkCharacterActor::ANetworkCharacterActor(const FObjectInitializer& ObjectInitializer) : Super(ObjectInitializer.SetDefaultSubobjectClass<UPMONetworkMovementComponent>(ACharacter::CharacterMovementComponentName))
{
	PrimaryActorTick.bCanEverTick = true;

    EntityComponent = CreateDefaultSubobject<UPMOEntityComponent>(TEXT("EntityComponent"));
	CombatComponent = CreateDefaultSubobject<UPMOCombatComponent>(TEXT("CombatComponent"));
}
Now we can check if the player is in combat or not!
Configuring the anim graph
Back to the animation blueprint, we now need to add this new state… For now I’ve added combat to the “Locomotion” state machine:

Arrows mean a a state transition, and the little symbols next to the lines are the transition states, let’s look at going from Walk / Run to Combat:
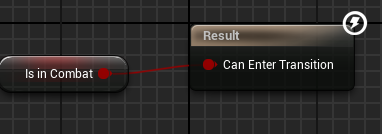
This Is in Combat variable is set back in our animation event graph:
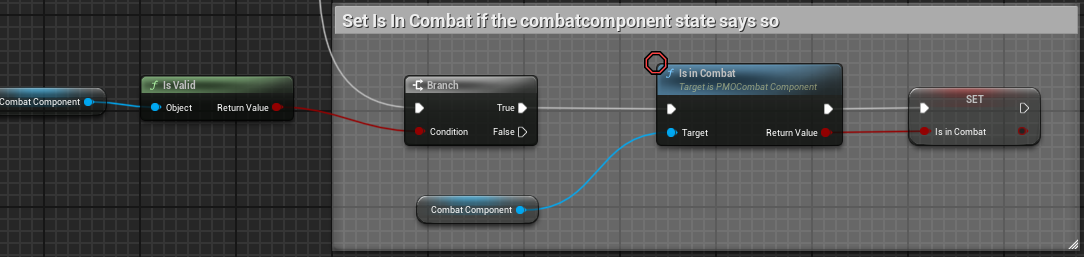
Of course this is going to get wayyy more complex with new abilities and combat types, but for now this works.
Now one thing that has been missing is the actual animation! Let’s go back to our Combat state, click into it and just map our animation:

You literally just drag them from a list of animations in. Of course we probably want to do a blend space so it looks better, but for now, let’s just drop in swing animation.
Visualizing the attack
Our debug render comes to the rescue again here. But you can see in the video below I created a 2 meter sphere around the character, which isn’t exactly what we want. But we can see that it spawns correctly and moves with us slightly as we move. You’ll notice I also added in a delay from when the swing starts to when the attack sphere is spawned.
I added a new attack details field that give a delay of when the attack starts, to when the attack sphere is spawned. I did this by watching the animation and seeing around .7s in, the arm is just about ready to hit something, with the remaining 1.2s to keep the attack sphere alive. Going forward this may be unnecessary, and we may (probably?) only want to spawn the attack sphere for a single frame as with hundreds of characters on screen it probably won’t make sense to have these attack spheres have such a long life.
BUT FIRST, I wanted to actually spawn the attack sphere in front of the character, not around the whole body of the character. And for that… we need to find the forward vector!
Finding the forward vector
The forward vector is just a vector that takes in an objects rotation and tells you which way it points forward. Seems simple right? Well, when you mix in different coordinate hand systems it can get a bit complicated!
I found this nice discussion to give me a head start on finding the forward vector in Jolt. Copying this code in directly does not work, and it took me a while to figure it out. Remember Jolt uses a left handed coordinate system with Y being up, however Unreal uses a right handed coordinate system with Z being up. As you can imagine doing rotations and translations in your head can get kinda confusing.

After some trial and error and some judicious use of debug rendering, I finally came up with:
units::Vector3 GetForwardVector() const
{
	// https://github.com/jrouwe/JoltPhysics/discussions/868#discussioncomment-8951378
	auto FwdVector = Character->PhysicsCharacter->GetRotation().RotateAxisX();
	// Negate the Z axis since UE uses the right handed coordinate system and jolt uses left handed
	return units::Vector3{FwdVector.GetX(), FwdVector.GetY(), FwdVector.GetZ()*-1.f};
}
We rotate by the X axis first, then we negate the Z axis (by multiplying by -1. I came up with this because while debugging, I noticed forward and backward was pointing correctly, but left and right where opposites! By negating the Z axis I get the correct forward vector for when you are facing left/right.
To visualize and debug all of this, I had to use the DebugRender and the following code:
auto CapsuleSize = Attacker->GetCapsuleRadius();
auto ForwardVector = Attacker->GetForwardVector();
float ArmReach = 1.5f + CapsuleSize;
ForwardVector *= ArmReach;
auto Position = Attacker->GetPosition();
auto OriginalPosition = convert::Vector3ToJPHVec3(Position);
Position += ForwardVector;
auto UpdatedPosition = convert::Vector3ToJPHVec3(Position);
PhysicsSystem->DebugRenderer->DrawLine(OriginalPosition, UpdatedPosition, JPH::ColorArg::sBlack);
Again, things like arm reach are hard coded now, but will probably be component data that comes from the character type. But now (in the video below) you can see we have a line pointing in the proper direction and can now spawn our sphere in front of the character instead of the sphere enveloping us!
Fixing the attack
Now we just apply this new UpdatedPosition that is our OriginalPosition + (ForwardVector * ArmReach) to where we want to spawn this attack sphere (and move it around) and we are good!
Here’s the final product:
Yay, now to work on taking damage and damage animations.
