New Year, new post! In my last post I was able to extract all the root motion data from the animation sequences I bought. I still need to apply that motion data to my characters on both the server and the client. This post will cover what it takes to do just that!
Step 1, formalizing the animation data
Using UE5’s bulk export feature, I exported all of the animations that have root motion data. Here’s the directory with just the Sword and Shield animations. As you can see, it’s quite a lot. Unfortunately, I can’t get all the information I need from just raw data. I have to actually visualize and time when attacks should be fired and when it’s safe (e.g. looks good) to transition from one animation to the next.

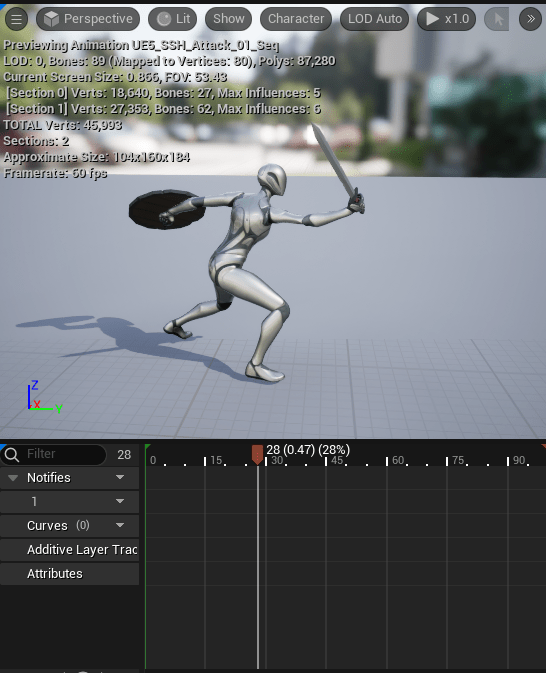
In the above image we want to fire our attack around 0.47 seconds into the animation. At this point the server will create an attack entity and physics collision sphere to see if it hits anything. If we created the attack entity too soon, it would be a terrible combat experience as you’d be hitting people/enemies before your sword was even swung!
*Note: in a pure UE5 game you’d just use AnimNotify events to capture when to execute these events.
Another bit we need to capture by using our eye balls is when it looks OK to transition (or blend) from one animation to the next. The animation packs I bought have “combos” so there’s sequences of attacks that will be blended in as you hold down the attack button. This image below shows the starting position of the second attack animation.
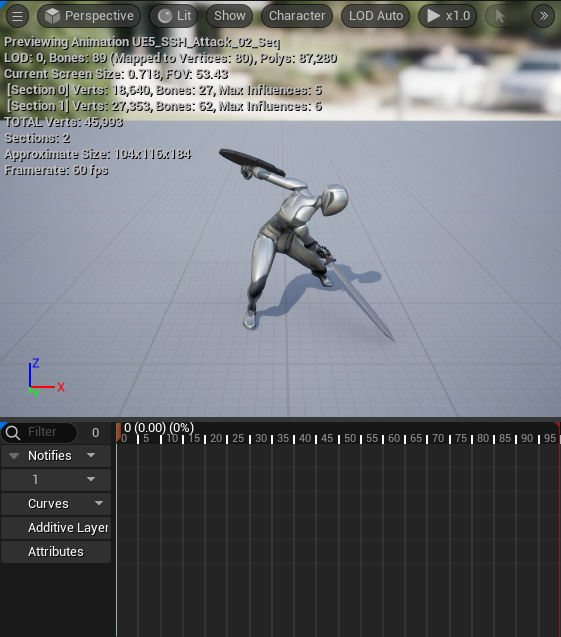
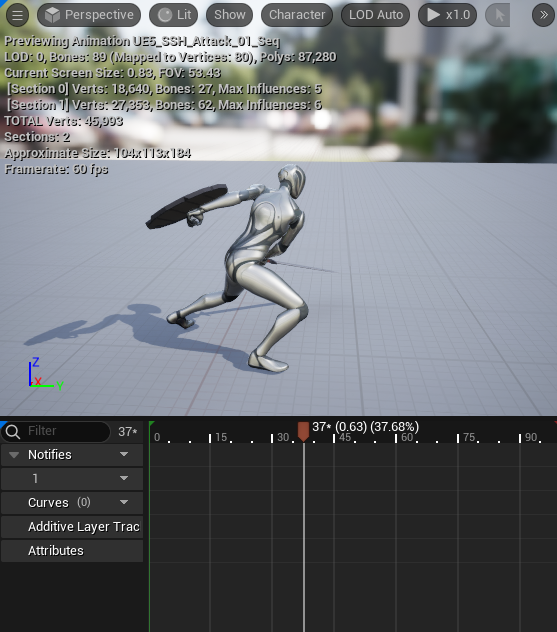
While not perfect, we’d want to allow transitioning from about this point (0.63 seconds) in our first animation:
Of course UE5’s animation blending will allow us to do it at any point, but I’d like to force the player to have to “follow through” with their attack before they are allowed to transition to the next attack. So I need to capture this time as well. It should be noted this animation pack also has shield based attacks, and I want to allow the player to “branch” into these attacks as well. So we can attack from slash “1” to slash “2” OR shield bash “2”. In this case I want to capture those “allowed to transition states”.
What I came up with is a small toml file that I manually fill out to capture all necessary data about an animation to load them:
[[animations]]
action_type = "SWORDSH_ATTACK_1"
combo_idx = 0
path = "SSH/UE5_SSH_Attack_01_Seq.csv"
attack_at_sec = 0.47
can_transition_to = ["SSH/UE5_SSH_Attack_02_Seq","SSH/UE5_SSH_Attack_08_Seq"]
transition_at_sec = 0.60
is_secondary = false

[[animations]]
action_type = "SWORDSH_ATTACK_2"
combo_idx = 1
path = "SSH/UE5_SSH_Attack_02_Seq.csv"
attack_at_sec = 0.38
can_transition_to = ["SSH/UE5_SSH_Attack_03_Seq","SSH/UE5_SSH_Attack_09_Seq"]
transition_at_sec = 0.66
is_secondary = false

[[animations]]
action_type = "SWORDSH_ATTACK_3"
combo_idx = 2
path = "SSH/UE5_SSH_Attack_03_Seq.csv"
attack_at_sec = 0.38
can_transition_to = []
is_secondary = false

# Shield attacks

[[animations]]
action_type = "SWORDSH_SEC_ATTACK_1"
combo_idx = 0
path = "SSH/UE5_SSH_Attack_08_Seq.csv"
attack_at_sec = 0.45
can_transition_to = ["SSH/UE5_SSH_Attack_09_Seq"]
transition_at_sec = 0.95
is_secondary = true

# more shield attacks ...
After some back and forth, I decided it’s easier if each attack had it’s own action_type state. As such I’ve updated my state list to capture all attack sequences.
Step 2, Load the data
The toml data gets turned into a simple struct which will turn into a flecs prefab. I chose prefabs because only one instance will be shared across all entities / players that have the animation loaded.
struct AnimData
    {
        uint8_t ComboIdx{};
        std::string Path;
        curves::Curve AnimCurve;
        float AttackAtSeconds{};
        std::vector<std::string> CanTransitionTo;
        float TransitionAtSeconds{};
        bool bIsSecondary;
        character::ActionType ActionType;
    };
First we extract the toml details:
for (const auto& Entry : *AnimTable)
{
	AnimData Anim;
	auto ActionType = Entry.at_path("action_type").value_or("NOOP");
	Anim.ActionType = character::action_map.at(ActionType);
	Anim.ComboIdx = Entry.at_path("combo_idx").value_or(0);
	Anim.Path = Entry.at_path("path").value_or("");
	Anim.AttackAtSeconds = Entry.at_path("attack_at_sec").value_or(0.f);
	Anim.bIsSecondary = Entry.at_path("is_secondary").value_or(false);

	Anim.TransitionAtSeconds = Entry.at_path("transition_at_sec").value_or(0.0f);
	auto CanTransition = Entry.at_path("can_transition_to").as_array();
	if (CanTransition)
	{
		for (const auto& Transition : *CanTransition)
		{
			Anim.CanTransitionTo.emplace_back(Transition.value_or(""));
		}
	}

	auto AnimPath = std::filesystem::path(Anim.Path);
	auto CsvPath = file.path().parent_path() / AnimPath;
	auto Reader = csv::CSVReader(CsvPath.string());

	auto Result = LoadCombatAnimations(Anim, AnimPath.string(), Reader);
	if (!Result)
	{
		Logger->Error("failed to load combat animation: {}", file.path().filename().string());
		return false;
	}
}
Then in LoadCombatAnimations, we calculate the necessary curve data and create a prefab with the name of the csv file:
bool Animation::LoadCombatAnimations(AnimData &Anim, std::string &&AttackName, csv::CSVReader &Reader)
{
	std::vector<double> KeyValues;

	int FrameCount = 0;
	for (const auto& Row : Reader)
	{
		if (Row["Axis"].get<std::string>() == "Y")
		{
			double KeyValue = std::abs(Row["Value"].get<double>()); // TODO it seems like the anims had Y be negative?
			KeyValues.emplace_back(KeyValue);
			FrameCount++;
		}
	}

	if (FrameCount == 0)
	{
		Logger->Warn("No frames found in combat animation data");
		return false;
	}

	float AnimRunTime = static_cast<float>(FrameCount) / 60.f;
	float TimePerFrame = AnimRunTime / static_cast<float>(FrameCount);

	uint32_t Idx = 0;
	for (const auto &FrameVal : KeyValues)
	{
		auto FrameTime = TimePerFrame*static_cast<float>(Idx++);
		Anim.AnimCurve.InsertOrderedKey(curves::CurveKey(FrameTime, FrameVal));
	}

	World.prefab(AttackName.c_str()).set<AnimData>({Anim});
	return true;
}
And now we have all of our animations and timing data loaded!
**Update Jan 4th 2025, I had to switch to loading the entire transform data as dodges used the X axis as well.
Step 3, Applying the data
My PMOCharacter class is shared between both the server and the client. This helps as the calculations will be the same both client & server side. Right now this is pretty messy as I haven’t cleaned it up, nor have i really ironed out all of the “transition to next combo attack logic”. But this is how it works:
- First we call HandleMovementInput which if we are not attacking, will simply move our character and apply physics / velocity to it.
- If we are doing any attacks or are incapacitated, we set velocity to zero (this will need to change to still apply gravity, but whatever).
- Then we call HandleActionInput, this handles our abilities, blocking etc.
- Get the characters forward and right vector so we know which way we are facing.
- We check to see if we are currently in the process of running an animation and if not,
- Look up which animation to use for our next attack based on what equipment we are holding (right now it’s hardcoded to sword/shield).
- Find the prefab with the animation data we need using a cached flecs query
- Use the information to set our DelayStartTime (when to create the attack entity), total RunTime, and some other metadata.
- Then call CharacterController->ApplyRootMotion.
- If we ARE attacking, extract the characters current AnimData and RunTime components.
- Check if the RunTime so far is greater than or equal to the AnimData curve’s total runtime.
- If it is, look up the prefab so we can remove the relationship
.remove(flecs::IsA, Prefab). Note with prefabs, you can’t just remove the component! You have to remove the relationship, this caught me off guard. We also remove the runtime component and set our characters state back toNOOP. - If RunTime is not over, then check if we can transition. Here we increment our combo index so we can know if we want to transition to the next attack. We then call CharacterController->ApplyRootMotion and add our current delta time to our current run time.
- Finally if neither of those conditions are true we call CharacterController->ApplyRootMotion and add our current delta time to our current run time.
Getting the characters forward and right vectors took me a bit, so to save someone else some trouble in the future looking for how to do this in Jolt:
JPH::Vec3 PMOCharacter::GetJoltForwardRightVector() const
{
	float X = CharacterController->PhysicsCharacter->GetRotation().RotateAxisX().GetX();
	float Z = CharacterController->PhysicsCharacter->GetRotation().RotateAxisZ().GetX();
	return JPH::Vec3{X, 0.f, Z};
}
The other system that took some thought was calculating the velocity, I do this in the ControllableCharacter class which manages the Jolt Physics logic of a character:
bool PlayerControlsHorizontalVelocity = PhysicsCharacter->IsSupported();
if (PlayerControlsHorizontalVelocity)
{
	auto Value = AnimCurve.Eval(RunTime);
	auto PreviousDelta = JPH::Clamp<float>(RunTime-DeltaTime, 0, 999);
	auto PreviousValue = AnimCurve.Eval(PreviousDelta);
	auto Distance = Value - PreviousValue;
	auto Velocity = (Distance / DeltaTime) / 100.f; // Jolt uses m/s
	DesiredVelocity = MovementDirection * Velocity;
	Log->Info("Velocity ({} m/s Distance: {} Value: {} PreviousValue: {}, DeltaTime {}, RunTime: {}", Velocity, Distance, Value, PreviousValue, DeltaTime, RunTime);
}
// Apply the motion using our newly set DesiredVelocity
ApplyMotion(DeltaTime, InRotation, PlayerControlsHorizontalVelocity, false, false, false);
First we get the value of the curve at the current runtime AnimCurve.Eval(RunTime). Then we take that runtime and subtract the delta time so we can get the previous runtime value (being sure to clamp!). Then we use that previous runtime to get what the value was at the previous frame. We now have our distance traveled: (Value - PreviousValue). Calculating velocity is a matter of Velocity = Distance / Time, but since Jolt uses meters and UE uses cm, I need to additionally divide the distance by 100.
In applying root motion, we use the Forward/Right vector in place of our Movement Direction. We then call into the generic ApplyMotion function which is used for applying all movement to a character, as well as applying gravity.
Step 4, Disabling Root Motion in UE5
Finally to make sure the client doesn’t also apply root motion we need to disable it in UE5.
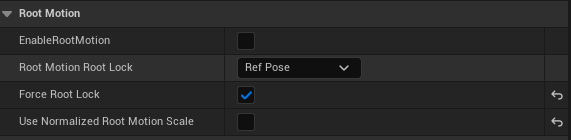
Make sure you click “Force Root Lock” otherwise the character will still move!
And the final result is, our character is now moving using root motion data on both the server and client regardless of which direction they are facing!
Next up will be getting the combos to work and adding in other attack styles (spear/shield up next!) I also need to get dodge and rolls in as this will be an Action RPG style MMO.
