
It is quite refreshing working on something other than netcode. This post is going to go into a bit of detail on how I plan on laying out the UE side of the inventory system. The flecs inventory system was adopted from the example flecs system. The flecs side of things will be the single source of truth as to what a player owns and can equip. However, for the visual side of things we still need to handle spawning weapons and other inventory item actors. Here’s my initial design spike, I’m sure I’ll iterate and change it as I learn more things.
Step 1: Data storage
I don’t want to have two sets of data for flecs and UE5 so all inventory will be defined in CSV files that both flecs and UE5 will read from. Here’s an example of my weapons:
Id,Hand,Name,WeaponType,DamageType,BaseDamage,WeightKg,Price,HitStartTimeSec,AttackTimeSec,MeshAsset,Icon
4097,1,"Short Sword",Sword1H,Slash,35,0.8,1,0.5,1.2,"/Script/Engine.StaticMesh'/Game/Art/Polygon/PolygonVikings/Meshes/Weapons/SM_Wep_Sword_01.SM_Wep_Sword_01'",""
4098,1,"1H Sword",Sword1H,Slash,50,0.8,1.5,0.7,1.2,"/Script/Engine.StaticMesh'/Game/Art/Polygon/PolygonAdventure/Meshes/SM_Wep_Sword_01.SM_Wep_Sword_01'",""
4099,1,"Base Axe",Sword1H,Slash,35,0.8,1,0.3,0.7,"/Script/Engine.StaticMesh'/Game/Art/Polygon/PolygonAdventure/Meshes/SM_Wep_Axe_01.SM_Wep_Axe_01'",""
4100,1,"Small Axe",Sword1H,Slash,40,1,5,0.3,0.7,"/Script/Engine.StaticMesh'/Game/Art/Polygon/PolygonVikings/Meshes/Weapons/SM_Wep_Axe_01.SM_Wep_Axe_01'",""
While this is straight forward to read in from the pmo library I need to also have UE5 bake this data in. And for that, I’m using Data Tables. I highly recommend watching the video linked from that data tables tutorial as there are some very important bits regarding memory management.
To use Data Tables we first want to define a USTRUCT for each individual row:
USTRUCT(BlueprintType)
struct FWeaponData : public FTableRowBase
{
	GENERATED_BODY()

    UPROPERTY(EditAnywhere, BlueprintReadWrite, Category = "Properties")
    int32 Id;

    UPROPERTY(EditAnywhere, BlueprintReadWrite, Category = "Properties")
    uint8 Hand;

    UPROPERTY(EditAnywhere, BlueprintReadWrite, Category = "Properties")
    FString Name;

    UPROPERTY(EditAnywhere, BlueprintReadWrite, Category = "Properties")
    EWeaponType WeaponType;

    UPROPERTY(EditAnywhere, BlueprintReadWrite, Category = "Damage Properties")
    EDamageClass DamageType;

    UPROPERTY(EditAnywhere, BlueprintReadWrite, Category = "Damage Properties")
    float BaseDamage;

    UPROPERTY(EditAnywhere, BlueprintReadWrite, Category = "Properties")
    float WeightKg;

    UPROPERTY(EditAnywhere, BlueprintReadWrite, Category = "Properties")
    float Price;

    UPROPERTY(EditAnywhere, BlueprintReadWrite, Category = "Damage Properties")
    float HitStartTimeSec;

    UPROPERTY(EditAnywhere, BlueprintReadWrite, Category = "Damage Properties")
    float AttackTimeSec;

    UPROPERTY(EditAnywhere, BlueprintReadWrite, Category = "Visual Properties")
    TSoftObjectPtr<UStaticMesh> MeshAsset;

    UPROPERTY(EditAnywhere, BlueprintReadWrite, Category = "Visual Properties")
    TSoftObjectPtr<UTexture2D> Icon;
};
Doing this allows us to use this type both in Blueprints and C++. Do note I’m using TSoftObjectPtr for complex UE object types. This is so when loading the data table we don’t inadvertently load all mesh assets/icon textures at once! What you want to do is load these assets asynchronously. But for now since I’m still kind of in the design phase, I’m just loading them synchronously from my inventory system on equip.
Now with our structure created, we can create and import the data table:

Two things to note, I had to use a custom Import Key Field otherwise Unreal would add a random row id. Now I can find weapons/items by their names. One downside to doing this is it clears the name field from my DataTable, leaving it empty??

And that’s it for loading data, on to step 2.
Step 2: Inventory Management
Armed with our data we need some place to reference the data table and manage finding rows and returning the row data. Since this will need to be done by multiple character types, I decided to centralize handling the management of data tables inside a custom GameInstance. Note the docs:
Spawned at game creation and not destroyed until game instance is shut down. Running as a standalone game, there will be one of these.
This is exactly what I want, a singleton :>.
Here’s the kind of high level flow that I expect to use:
- Create custom game instance that has a reference to the DataTables
- Create a blueprint of the custom game instance so it’s easy to set a reference to the DataTables
- Override the default GameInstance with the Blueprint version of my custom instance
- Expose functions on GameInstance to allow callers to find data they need
- Characters/Actors expose functions for equipping data, which finds the data from the game instance, then passes the data to an inventory component.
- Actors will have an Inventory component that will do the high level, character/actor specific management of items
- Inventory component spawns an instance of the (in this case weapons) item and attaches it to the actor via Sockets. Also deals with despawning/destroying any items no longer equipped.
Here’s what that looks like in code, starting with the custom GameInstance:
// PMOGameInstance.h
UCLASS()
class PMOCLIENT_API UPMOGameInstance : public UGameInstance
{
	GENERATED_BODY()
public:
	virtual void OnStart() override;

	const FWeaponData* FindWeaponData(const FName WeaponName);

	UPROPERTY(EditAnywhere, Category = Data, meta = (AllowPrivateAccess = "true"))
	TSoftObjectPtr<UDataTable> Weapons;
};

// PMOGameInstance.cpp
void UPMOGameInstance::OnStart()
{
	Super::OnStart();
	if (!Weapons.IsValid())
	{
		UE_LOG(LogTemp, Error, TEXT("Weapons data not set, make sure to set in blueprint!"));
		return;
	}
}

const FWeaponData* UPMOGameInstance::FindWeaponData(const FName WeaponName)
{
	if (!Weapons.IsValid())
	{
		UE_LOG(LogTemp, Error, TEXT("Weapons data not set, make sure to set in blueprint!"));
		return nullptr;
	}

	const FString Context = TEXT("");
	auto WeaponData = Weapons->FindRow<FWeaponData>(WeaponName, Context);
	WeaponData->Name = FString(WeaponName.ToString());

	if (!WeaponData)
	{
		UE_LOG(LogTemp, Error, TEXT("Failed to find weapon by name: %s"), *WeaponName.ToString());
		return nullptr;
	}
	return WeaponData;
}
Pretty straight forward, we ensure the weapons Data Table are set in the blueprint, then we use FindRow with the weapon name to look up the weapon data (the struct we defined earlier.)
Next we create the inventory component, this is attached to any actor that is going to have an inventory, so all characters and probably monsters.
// PMOInventoryComponent.h
UCLASS( ClassGroup=(Custom), meta=(BlueprintSpawnableComponent) )
class PMOCLIENT_API UPMOInventoryComponent : public UActorComponent
{
	GENERATED_BODY()

public:
	// Sets default values for this component's properties
	UPMOInventoryComponent();

	UFUNCTION(BlueprintCallable, Category = "Equip")
	void EquipWeapon(const FWeaponData &WeaponData, const EEquipmentSlots Slot);

	UFUNCTION(BlueprintCallable, Category = "Equip")
	bool SlotEquipped(const EEquipmentSlots Slot);

	void Unequip(const EEquipmentSlots Slot);
	// void EquipItem(const FItemData ItemData, const EEquipmentSlots Slot);

	UPROPERTY(EditAnywhere, Category = "Equip")
	TMap<EEquipmentSlots, AActor*> EquippedItems;

protected:
	// Called when the game starts
	virtual void BeginPlay() override;


public:
	// Called every frame
	virtual void TickComponent(float DeltaTime, ELevelTick TickType, FActorComponentTickFunction* ThisTickFunction) override;
};

// PMOInventoryComponent.cpp: Just the equip weapon method:
void UPMOInventoryComponent::EquipWeapon(const FWeaponData &WeaponData, const EEquipmentSlots Slot)
{
	if (Slot != EEquipmentSlots::LEFT_HAND && Slot != EEquipmentSlots::RIGHT_HAND)
	{
		return;
	}

	Unequip(Slot);
	FName SocketName;
	if (Slot == EEquipmentSlots::LEFT_HAND)
	{
		SocketName = FName(WeaponData.Name.ToLower() + TEXT("_l"));
	}
	else if (Slot == EEquipmentSlots::RIGHT_HAND)
	{
		SocketName = FName(WeaponData.Name.ToLower() + TEXT("_r"));
	}

	auto CharacterMesh = GetOwner()->GetComponentByClass<USkeletalMeshComponent>();

	FTransform Transform; // Just use empty transform
	auto Weapon = GetWorld()->SpawnActorDeferred<AWeapon>(AWeapon::StaticClass(), Transform, GetOwner());
	FAttachmentTransformRules Rules(EAttachmentRule::SnapToTarget, true);

	Weapon->WeaponData = WeaponData;
	UGameplayStatics::FinishSpawningActor(Weapon, Transform);

	Weapon->AttachToComponent(CharacterMesh, Rules, SocketName);
	EquippedItems.Emplace(Slot, Weapon);
}
The EquipWeapon method is the most interesting, we first unequip any weapon we have equipped for the provided Slot.
These slots match the slots we have defined in ECS. I then look up the character’s skeletal mesh to find the socket to attach the weapon to. We then defer spawning the weapon actor, this is so we can pass in our weapon data to the Weapon first so it has a mesh to load.
We then attach the weapon to the character mesh using the EAttachmentRule::SnapToTarget and weld FAttachmentTransformRules and pass in the socket name we resolved via the name of the weapon.
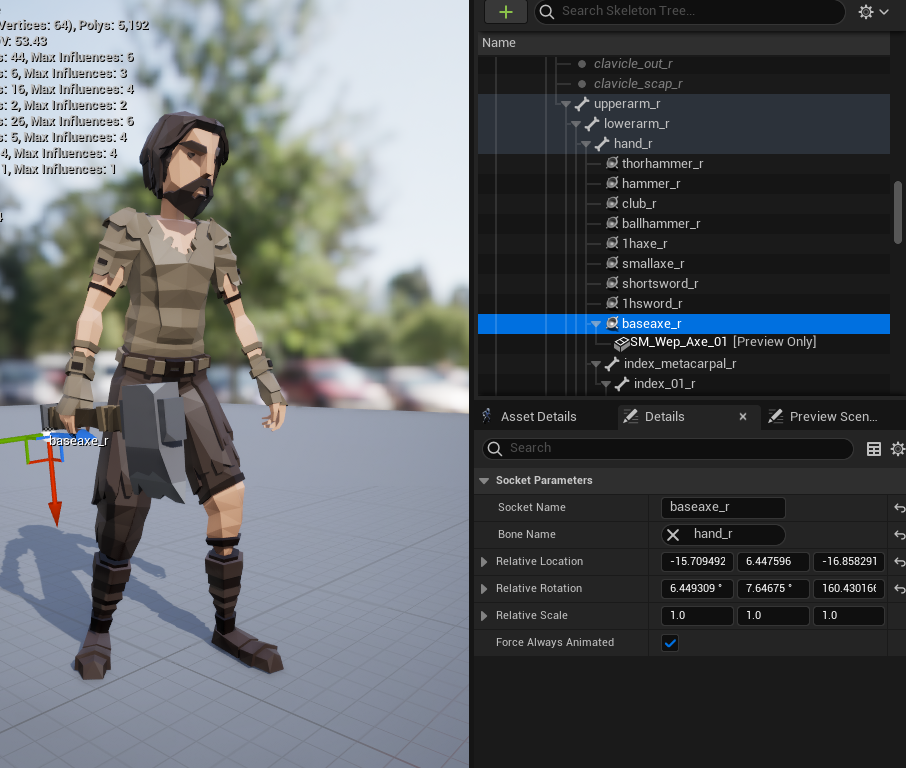
Note, I took a rather unorthodox approach of creating a single socket per weapon type. This is due to using different types of assets from different asset packs. If I ever get funding I’d have proper assets made that fit the character models and would set the origin to exactly where they need to be held on the handle of the weapon. But for now, I’ll just do things manually.
By manually, I mean I had to painstakingly go through each weapon and line them up properly with the sockets created on the hand bone. The alternative would be to store the offset from the socket in the CSV file, but that would only work if I used the same skeletal mesh for every single monster and character, which… I don’t plan on doing. (I want dwarves and gnomes in my game damnit!)
If anyone has suggestions on how to better handle the situation of equipping lots of different items on lots of different skeletal meshes in a more scalable way please reach out to me on mastodon!
Step 3: Weapons
Weapons are going to be their own actors, for now they handle the spawning of their meshes as well as have references to their actual ECS entity via the EntityComponent (which is something I attach to any actor that has an ECS entity value):
// Weapon.h
UCLASS()
class PMOCLIENT_API AWeapon : public AActor
{
	GENERATED_BODY()

public:
	// Sets default values for this actor's properties
	AWeapon();

	UPROPERTY(VisibleAnywhere, BlueprintReadOnly, Category = PMO, meta = (AllowPrivateAccess = "true"))
	TObjectPtr<class UPMOEntityComponent> EntityComponent;

	UPROPERTY(VisibleAnywhere, BlueprintReadOnly, Category = Visual, meta = (AllowPrivateAccess = "true"))
	TObjectPtr<class UStaticMeshComponent> WeaponMesh;

	FWeaponData WeaponData;

protected:
	// Called when the game starts or when spawned
	virtual void BeginPlay() override;

public:
	// Called every frame
	virtual void Tick(float DeltaTime) override;
};

// Weapon.cpp
AWeapon::AWeapon()
{
 	// Set this actor to call Tick() every frame.  You can turn this off to improve performance if you don't need it.
	PrimaryActorTick.bCanEverTick = true;
	WeaponMesh = CreateDefaultSubobject<UStaticMeshComponent>(TEXT("StaticMeshComponent"));
	RootComponent = WeaponMesh;
	SetActorEnableCollision(false);
}

// Called when the game starts or when spawned
void AWeapon::BeginPlay()
{
	Super::BeginPlay();
	auto Weapon = WeaponData.MeshAsset.LoadSynchronous();
	if (!Weapon)
	{
		UE_LOG(LogTemp, Warning, TEXT("Weapon Failed to load mesh!"));
		return;
	}
	UE_LOG(LogTemp, Warning, TEXT("Weapon loaded: %s %s"), *Weapon->GetPathName(), *WeaponData.Name);
	WeaponMesh->SetStaticMesh(Weapon);
	WeaponMesh->SetVisibility(true);
}


// Called every frame
void AWeapon::Tick(float DeltaTime)
{
	Super::Tick(DeltaTime);
}
The only interesting thing here is we disable collision on construction, and we synchronously load the mesh asset on spawn. This loading of assets will probably done in the custom game instance once I finalize the design.
Step 4: Tying it altogether
Finally we tie it all together using our Character class and look up and equip the items by name:
void APMOClientCharacter::EquipWeaponByName(FString WeaponName)
{
	auto GameInstance = Cast<UPMOGameInstance>(UGameplayStatics::GetGameInstance(GetWorld()));
	if (!GameInstance)
	{
		UE_LOG(LogTemp, Warning, TEXT("Failed to get game instance"));
		return;
	}
	FName Weapon = FName(*WeaponName);
	const FWeaponData* WeaponData = GameInstance->FindWeaponData(Weapon);
	if (!WeaponData)
	{
		UE_LOG(LogTemp, Warning, TEXT("Failed to find Weapon: %s"), *Weapon.ToString());
		return;
	}
	UE_LOG(LogTemp, Warning, TEXT("Equipping Weapon %s"), *WeaponName);
	InventoryComponent->EquipWeapon(*WeaponData, EEquipmentSlots::RIGHT_HAND);
}
To test all of this out, I created a simple blueprint keybind event to test loading all the weapons:
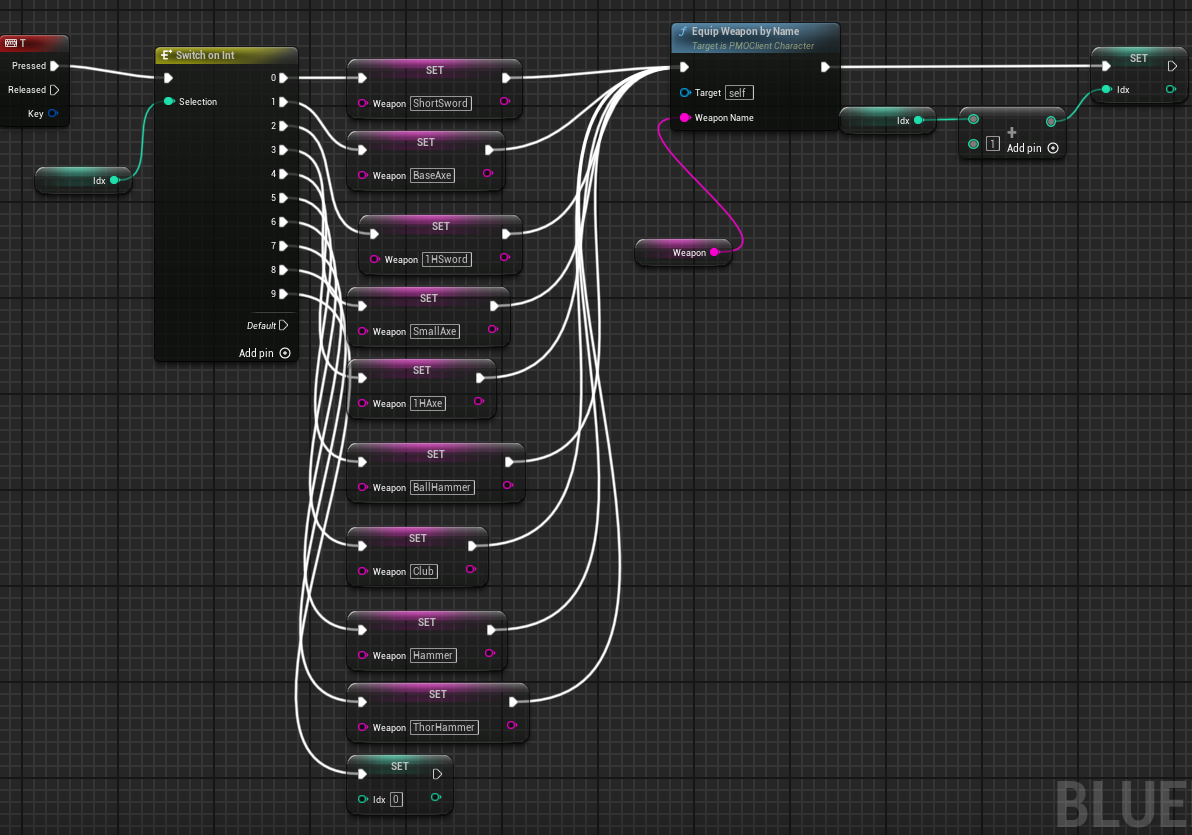
Super silly but again, testing only, and here’s the result!
What’s next
Next is tying this back into ECS. Obviously in an MMORPG you can’t just willynilly equip items, you need to request access from the server to validate the character has the item, is in a state they can equip, and that it’s successful. For that I’ll be using the reliable UDP channels as we need verification unlike our other world update packets which use unreliable UDP channels.
But for now, it’s nice to see visual updates to my game instead of looking at network logs 24×7.
